Sunday, December 20, 2009

Buckeyes

I have so many fond memories of making these with Grandma when I was younger!
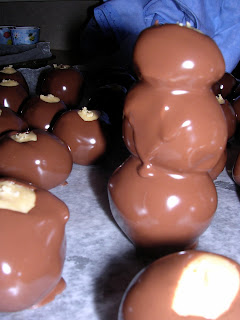
Fighting with my siblings and cousins over who gets to eat the 'snowmen'....
Dropping the WHOLE buckeye into the chocolate, then having to fish it out with a spoon....
Sneaking some when Grandma wasn't looking (just kidding Grandma! We would never do that. Ever.) ...
Hiding some in my bedroom so my brothers wouldn't eat them all...

...the more I think about it, the more I am amazed that Grandma was willing to do this with us (the cousins). Oh well, we did have loads of fun! And I'm assuming Grandma had fun too. We must have been pretty entertaining, at the very least.

This was my first time making these by myself, without Mama or Grandma doing the majority of the work. I was pretty nervous, and had a near mishap (for some reason, I first measured 3 cups of powdered sugar. If it's REALLY sticky and liquidy, you didn't add enough powdered sugar), but they turned out pretty well! I am quite proud of myself. :)

Grandma Mickey's Buckeyes


3 Pound powdered sugar
2 Pound peanut butter
1 Pound butter, softened
12 Ounce semisweet chocolate chips
12 Ounce milk chocolate chips
1 bar paraffin

Instructions:
Mix together powdered sugar, peanut butter, and butter. Roll into small balls; refrigerate overnight. (Or freeze for a couple hours.) Melt together chocolate chips and parrafin wax, preferably in a double boiler. Dip balls in chocolate mixture using toothpicks to spear. Drop on wax paper. Chill.


(Note how pretty mine are! And the snowmen. I LOVE making snowmen. Seriously, three buckeyes for one! WOOHOO!)

GRADUATION


So, not to toot my own horn or anything, but I (finally) graduated from college yesterday. (I say finally because the last 4 1/2 years have seemed like TWENTY.)
I earned my bachelor degree in health care systems administration, and I was SO excited to be done! We had a small get-together at the apartment afterwards... I forgot to get the camera out until after Uncle Rod & Aunt Joy left, but here are some pictures.

(The baby was definitely the center of attention for a lot of the time!)
(Nate & Kyle were teaching Jonah how to play Little Big Planet...)
(It is extremely hard to get both kids to look @ the camera!!)
(Now Kate is learning!)

Saturday, December 12, 2009

Peppered meatballs, and an update on the puppy

So, first of all, we've changed Georgie's name to Remus. We'll see how well he takes to his new name.... :)

This recipe was something I tried for dinner... and it was a little TOO peppery. Other than that, it was VERY good! So, we are adapting it for the next time!

It is very flavorful. All of the little ingredients really added to the flavor of the meatballs themselves, and the sauce was spectacular. I was concerned that there might be too much of the sour cream flavor, but that wasn't much of a problem at all.

No pictures though... so you'll just have to imagine what it looks like. :) (When we have the leftovers, I'll get a picture.)

Peppered Meatballs
(TOH)

1/2 Cup sour cream
2 Teaspoon Parmesan
1/2 Teaspoon pepper
1 Teaspoon salt
1 Teaspoon dry bread crumbs
1/2 Teaspoon garlic powder
1 1/2 Pound ground beef
sauce:
1 Cup sour cream
10.75 Ounce condensed cream of mushroom soup
2 Teaspoon dill weed
1/2 Teaspoon sugar
1/2 Teaspoon pepper
1/4 Teaspoon garlic powder

Instructions:
In a bowl, combine sour cream and Parmesan. Add pepper, salt, bread crumbs, and garlic powder. Crumble meat over mixture and mix well. Shape into 1" balls. Place in a greased baking pan. Bake at 350 for 20-25 minutes or until no longer pink.
Combine the sauce ingredients in a bowl.
Transfer meatballs to a slow cooker. Pour the sauce over the meatballs. Cover and cook on high for 2 hours or until heated through.

Serve over hot buttered noodles for a main course.

Yields: about 20 meatballs, 2 c sauce

Friday, December 11, 2009

GEORGIE!

If you weren't aware, I am graduating next week. (Which, if you've talked to me recently, would be hard not to be aware of, since it's one of the only things I can talk about lately.)
If you weren't aware, Christmas is in two weeks. (... I don't know how this could come as a surprise, given the stores have been advertising it for two months, and the fact that us Michiganders just got a couple truckloads of snow dumped on every square foot of the state.)

Due to these fantastic events, my husband decided I could have a dog for Christmas/graduation. (Seriously, isn't he the best husband EVER?)

I have been oogling over puppies/dogs on the shelter website for a few weeks, changing my mind every day or so on what adorable, sad-looking puppy I wanted. (Note that all dogs were being called puppies at this point.)

I convinced Nate last week that we should go to the shelter TODAY, the 11th, to get the puppy. We were originally thinking tomorrow (Saturday), but I want to go visit my parents Sunday, so we decided to give the dog time to get used to us and the house before took a road trip.


Last night, once last time, I checked out the shelter website. There were two VERY cute coonhounds there--a red, and a brown/black. The red was older (a few years?) and the black/brown was 4 months. A little younger than we wanted, but he just looked so SAD. I promised Nate I would consider all the puppies though!


When we got there, we saw the black/brown coonhound first. It was basically love at first sight! I wanted to take him home right away! He was super adorable, and so sweet! I checked out the other dogs (the red coonhound was gone), and I was slightly tempted by an adorable spaniel mix. He was very sweet too, but I had to take the hound. :)

His name is George, and he is the sweetest dog I've ever met. He is pretty shy, and was scared at first. He's quickly getting used to his new home though!

(Although he seems to be afraid of heights... won't go up or down our stairs, I've had to carry him every time. He's 40+ pounds, and just shakes in my arms. Tomorrow I'm going to try the trip w/ treats, and see how well that goes.)


And we are discovering he kinda snores... which actually just increases his adorable-ness right now!

Saturday, December 5, 2009

Ham-Stuffed Jumbo Shells

I've never made stuffed shells before, so this was interesting to me. As usual, I thought it had too much green pepper in it... I still haven't learned to like that stuff. :)

Probably wouldn't make this again--Nate wasn't fond of the green pepper-ham combo. Otherwise, I thought it was pretty good. Just need some alterations for next time! Cut out the green pepper, replace with something else maybe.

Ham-Stuffed Jumbo Shells
(TOH)


12 jumbo pasta shells
1 1/2 Tablespoon all purpose flour
1 Cup milk
1/4 Pound fresh mushrooms, chopped
1/4 Cup chopped onions
1/4 Cup chopped green pepper
1 Tablespoon canola oil
1 1/2 Cup cubed fully cooked ham
1 Cup shredded 4 cheese mexican cheese
1 1/2 Tablespoon grated parmesan
1/2 Teaspoon Parsley

Instructions:
Cook pasta according to package directions. Meanwhile, in a small saucepan, combine flour and milk until smooth. Bring to a boil; cook and stir for 2 minutes or until thickened. Remove from the heat; set aside.
In a large nonstick skillet, saute the mushrooms, onion, and green pepper in oil until tender. Reduce heat; add the ham, 1/2 cup cheese, and parmesan. Cook and stir until cheese is melted. Remove from the heat. Stir in 1/4 cup of the reserved sauce.
Drain pasta, stuff each shell with about 3 tbsp of filling. Place in an 8x8 baking dish coated with cooking spray. Top with remaining sauce. Cover and bake at 350 for 30 minutes or until heated through. Sprinkle with parsley, and remaining cheese.


Serves: 4
Serving Size: 3 stuffed shells
Yields: 12

Calories: 274
Cholesterol: 26 mg
Fat: 7 g
Saturated Fat: 2 g
Calories From Fat:
Protein: 23 g
Carbohydrates: 30 g
Sodium: 703 mg
Fiber: 2 g

Wednesday, December 2, 2009

Pizza!!

I love pizza. Love, love, love it! Granted, it's really not very good for me, so I try not to have it too much.

Nate loves having whole wheat crust, so I started using this recipe. I won't eat the crust around the edges--I think it's a little too dry. Other than that, I love this recipe. We changes the ingredients a lot, this is just what I used the last time. :)


Whole Wheat Pan Pizza
(Better Homes and Gardens Cookbook)

1 1/4 Cup all purpose flour
1 3/4 Cup whole wheat flour
2 1/4 Teaspoon active dry yeast
1/2 Teaspoon salt
1 Cup warm water (120-130 degrees)
2 Tablespoon cooking oil/olive oil
15 Ounce pizza sauce
1 Teaspoon pizza seasonings
4+ Cup mozzarella cheese, shredded
1 mushroom, cut into small pieces
1/2 Small onion, chopped finely
1/4 Cup ham, chopped
3 Ounce Pepperoni

Instructions:
In a large mixing bowl, combine the all-purpose flour, yeast, and salt; add warm water and oil. Beat with an electric mixer on low speed for 30 seconds, scraping bowl. Beat on high speed for 3 minutes. Using a wooden spoon, stir in as much of the whole wheat flour as you can.
Turn dough out on a lightly floured surface. Knead in enough remaining flour to make a moderately stiff dough that is smooth and elastic (6-8 minutes total). Cover, let rest for 10 minutes.

Grease a large round pizza pan. If desired, sprinkle with cornmeal. On a lightly floured surface, roll the dough enough to cover the pan, with some excess. Transfer to prepared pan. Build up edges slightly with excess dough.
Cover and let rise in a warm place until nearly double (30-45 minutes).
Meanwhile, preheat oven to 400. Prick dough with a fork. Bake 10-15 minutes or until light brown. Spread with pizza sauce, seasonings, cheese, and toppings. Bake about 10 minutes longer or until bubbly. Cut each pizza into 8 wedges.


Serves: 8